

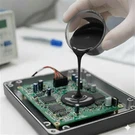



Two-part silicone potting compounds are commonly used to protect electronic components from moisture, vibration, and environmental stress. When potting materials are damaged due to mechanical stress or aging, proper repair techniques can help restore protection and extend product service life.
First things first, let's understand what 2 Part Silicone Potting Compound is. It's a great material for protecting electronics from moisture, dust, shock, and other pesky environmental factors. You mix two components together, and it cures to form a protective layer.
Step 1: Assess the Damage
Before you start repairing, you need to take a good look at the damaged potting. Is it a small crack, a big chunk missing, or something in between? This will help you decide how much potting compound you'll need and what kind of repair method to use.
If it's just a small crack, you might not need to remove much of the existing potting. But if a large area is damaged, you'll probably have to remove the old potting and start fresh. You can use a small sharp tool like a scalpel or a hobby knife to carefully remove the damaged parts. Be super careful not to damage the electronics underneath.
Step 2: Gather Your Materials
Once you know what you're dealing with, it's time to gather the materials. Of course, you'll need our 2 Part Silicone Potting Compound. We have different types to suit various needs. For example, if you're working on electronics that are prone to vibrations and need flame retardancy, you can check out our Flame-Retardant RTV Silicone Potting Compound for Vibration-Prone Electronics | SFY-161-Taiwan. It's a great option.
You'll also need mixing containers. These can be simple disposable plastic cups. Make sure they're clean and dry before you start. And don't forget some mixing tools like stirrers. You can use popsicle sticks or small plastic spatulas.
Step 3: Prepare the Surface
After removing the damaged potting, you need to prepare the surface for the new potting. Clean the area thoroughly to get rid of any dust, debris, or old potting residue. You can use isopropyl alcohol and a clean lint-free cloth for this. Just gently wipe the surface until it's clean.
Step 4: Mix the 2 Part Silicone Potting Compound
Now it's time to mix the potting compound. Read the instructions on the product carefully because different compounds may have different mixing ratios. Usually, you'll need to mix the two components in a proper ratio by volume or weight.
Start by pouring the base component into the mixing container. Then, add the curing agent according to the ratio. Stir the mixture slowly and thoroughly for a few minutes. Make sure there are no pockets of unmixed material. It's important to mix it well to ensure proper curing.
Step 5: Apply the Potting Compound
Once the compound is well-mixed, it's time to apply it to the prepared area. You can use a small syringe or a spatula to apply the compound. If it's a small crack, carefully inject the compound into the crack using the syringe. Make sure it fills the crack completely.
For larger areas, spread the compound evenly over the area using the spatula. Try to keep the surface as smooth as possible. You may need to apply the compound in multiple layers if the area is deep or thick. Let each layer cure according to the product instructions before applying the next one.
Step 6: Curing
After applying the potting compound, it needs to cure. The curing time depends on the type of compound and the environmental conditions. Usually, it takes a few hours to a few days. Keep the repaired area in a clean and dry place during the curing process.
Step 7: Inspect the Repair
Once the potting compound is fully cured, take a close look at the repair. Check for any air bubbles, unevenness, or other defects. If there are any issues, you can try to fix them. For example, if there are air bubbles, you can gently press on the surface to release them.


Other Types of Our 2 Part Silicone Potting Compound
We also have other great products. For those who need a clear and transparent option for electrical applications, we have 2 Component Transparent Clear Electrical Silicone Gel. It's perfect for applications where you need to see the components inside.
And if you're looking for a fire-resistant option for electrical potting, our Rtv2 Fire Resistant Electrical Potting Resin is a great choice. It provides excellent fire protection for your electronics.
Conclusion
Repairing a damaged potting with 2 Part Silicone Potting Compound isn't that difficult if you follow these steps. Just take your time, be careful, and use the right materials.
If you're interested in our 2 Part Silicone Potting Compound products or have any questions about the repair process, feel free to reach out to us for a purchase negotiation. We're here to help you find the best solution for your needs.
References
- General knowledge of 2 Part Silicone Potting Compound from industry experience.
- Product information provided by our company's research and development team.